As the years go by and you accumulate more digital photos, videos and songs - you quickly realize how important and precious storage space is on your computer and other devices. If you are someone that has a large iTunes library filled with music, movies, podcasts and more - you might want to consider storing this library on an external drive versus the local storage of your computer. Doing so will free up space on your computer without compromising the iTunes experience you are used to.
Should I Transfer iTunes to an External Drive?
If you are not aware of what is taking up space on your computer, you can click on the Apple logo in the upper-left hand corner of the desktop, select “About this Mac”, then “More Info…”, and then finally click the “Storage” tab toward the top of the window. You will see a succinct storage breakdown of your computer’s hard drive. If the your computer is nearly full, you might want to consider migrating your iTunes library to an external hard drive.

If the Storage view of About This Mac does not help you make sense of what’s taking up space on your hard drive, give this post of ours a read.
How Large is my iTunes Library?
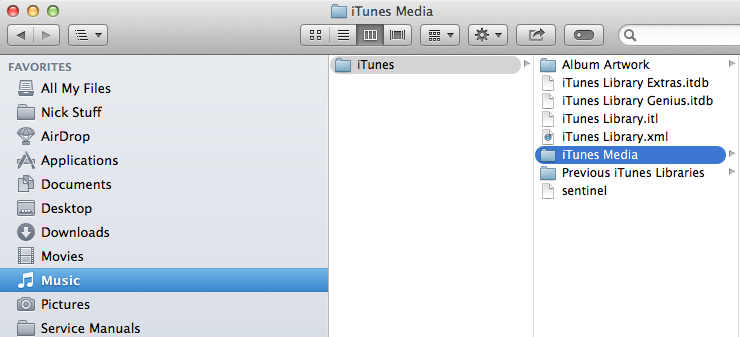
If your iTunes library does not take up much space, you may not need or want to transfer it to an external hard drive. To find out how large your library is, open the Finder application and then navigate through the following folders: Music > iTunes > iTunes Media.

The “Music” folder should appear in the sidebar of Finder. If it does not, click the “Finder” option in the desktop toolbar and select “Preferences…”. Click the “Sidebar” option toward the top of the window and make sure “Music” is check-marked.
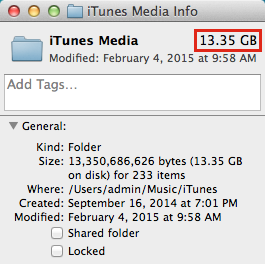
Once you’ve found the “iTunes Media” folder in Finder, select it and use the hotkey command + i on your keyboard. This will pull up an info pane where you will be able to see the size of your Library. The iTunes Media folder contains the raw files of content stored in iTunes, so knowing the size of this folder will tell you how much space you can save by migrating your iTunes library to an external drive.

How to Setup an iTunes Library on an External Drive
Step 1: Transfer iTunes media folder to your external drive
Once you’ve connected an external drive to your computer, you are going to want to go back into the Finder application. This process will be easiest if you open two Finder windows. You can do this by selecting File > New Finder Window. Next, navigate back to the iTunes Media folder and drag the entire folder onto your external drive (the drive should show up under the “Devices” section in the Finder sidebar).
Step 2: Delete content in iTunes
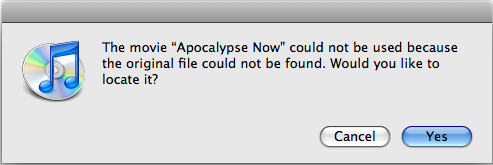
You might notice that if you go back into the iTunes program after transferring your iTunes Media folder and try to play a song or video, you will be presented with this message:

This is because iTunes is still looking for these files in their original location on your computer’s hard drive. There are several ways to fix this, but if you have a large library, the best way to do it is to delete all of your content in iTunes and reimport it from your external hard drive. To do this, simply open the iTunes program, navigate to the Music section and then use the select-all command (command+a) to highlighted the entire section. Click delete on your keyboard and confirm the deletion in iTunes.
Remember, this process does not delete the actual files as those are all stored on your external drive. You can think of the content listed in iTunes as shortcuts instead of actual files. Do the same process for Movies, TV Shows and any other categories that you have iTunes content stored in.
Step 3: Reimport the iTunes media files from your external hard drive
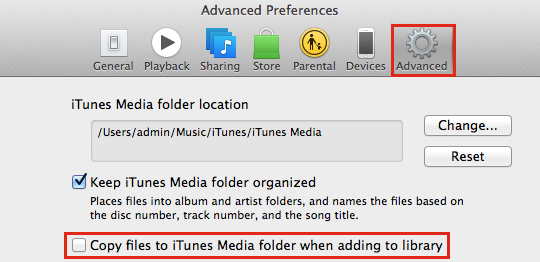
The last thing we need to do is reimport your iTunes files from the external hard drive. In the iTunes program, click the “iTunes” option in the desktop toolbar and select “Preferences…”. Select the “Advanced” tab and uncheck the “Copy files to iTunes Media folder when adding to library”. If we do not uncheck this option, when we go to copy the files from your external back into iTunes, iTunes will import those files back onto your computer and they will take up the same amount of hard drive space as before.

Now, open the iTunes Media folder on your external hard drive, go into the Music folder and use the select-all hotkey to select all of the files. Then, simply drag and drop these files into the iTunes Music section. Do this same process for each category of content, dragging and dropping the files into their respective places within the iTunes program.
 Voila! You have successfully re-routed your iTunes library from your computer’s local storage to an external hard drive. Now, when you click to play a song within iTunes, it is accessing it via the external hard drive. This means that your hard drive must be plugged-in in order to play content. If you want to keep your files stored on an external hard drive, but still be able to access them in iTunes without having the hard drive plugged in, I highly recommend subscribing to iTunes Match. Find out all about iTunes Match here.