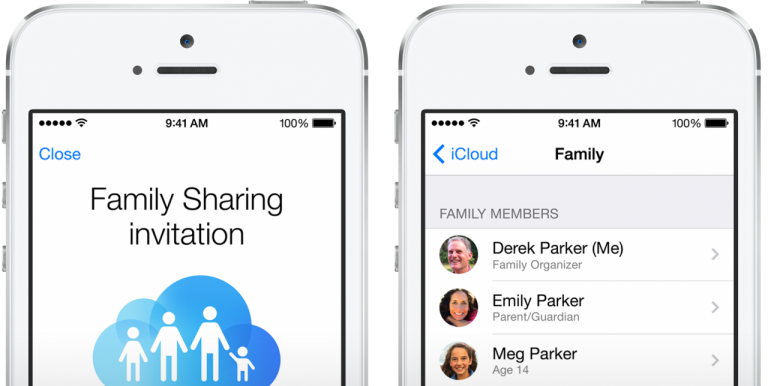
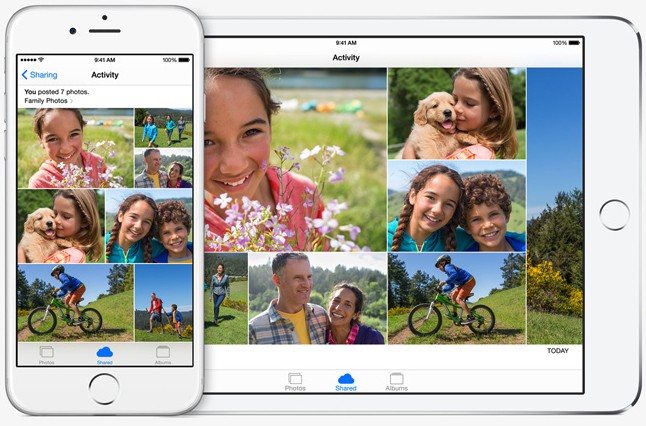
So, you and your family have decided to share an Apple ID in order to share purchases in the App Store and iTunes. Pretty sneaky! Everything is going fine until you power on your phone and start receiving your mother’s texts. Then, you open up the Photos app and notice that your Photo Stream has become an amalgamation of you entire family’s photos. As you might imagine, this can be a serious and potentially embarrassing situation. If this sounds familiar to you, you and your family should consider switching over to Apple’s Family Sharing, a new feature in iOS 8 that allows families to have separate Apple ID’s while still being able to share iTunes and App Store purchases.
Hold Up, What’s An Apple ID?
Just in case you are new to Apple or need a refresher, your Apple ID is the username and account for almost everything you do through Apple - whether its shopping in iTunes, syncing with iCloud, buying from the Apple Online Store or accessing the Apple Support website.
On current Apple devices, you login with an Apple ID in two different places: the App / iTunes Store and iCloud. The Apple ID logged into the App / iTunes store deals with purchasing content through Apple and the ID logged into iCloud deals with syncing data between devices and to iCloud.com. You can use the same Apple ID to log into both of these places, or different ID’s.
In a previous post, we discussed how families can manage multiple Apple ID’s. That, however, was before the release of iOS 8 and Family Sharing. Now, families who wish to share purchases but keep the synchronization of personal data in iCloud on their own devices can do so easily through Family Sharing.
What is Family Sharing?
Apple touts Family Sharing as “a new way to bring harmony to your family’s digital life.” Family Sharing allows up to six people to share purchases without sharing accounts. This way, you can share the content you want with your family while keeping your private information private. Family Sharing also provides excellent features for parents who wish to monitor or restrict their kids’ access to their devices as well as a few additional features that help families stay connected.
Family Photo Album
Family Sharing automatically creates a shared family photo album in the Photos app. This way, your family can easily add and comment on photos from the latest family events. The family photo album is great for compiling family memories and staying visually connected to your loved ones.
Family Calendar
Are your kids constantly late to family events? Family Sharing creates a shared family calendar. You can now easily coordinate events with the entire family. It’s also easy to set up reminders to alert family members.
Find My Friends and Find My iPhone
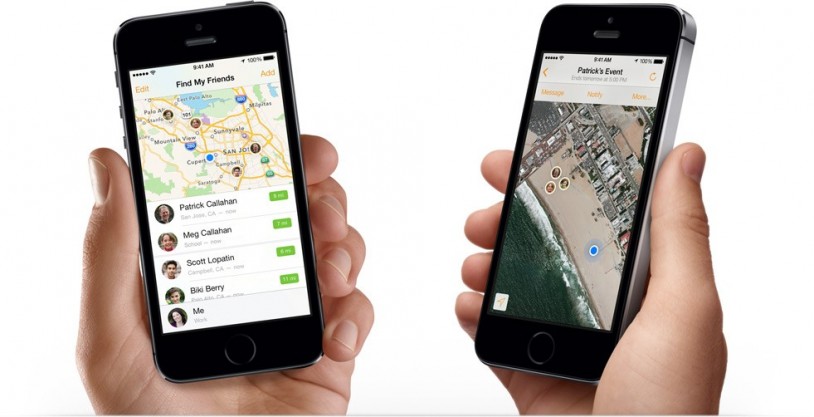
Family Sharing automatically adds your family’s devices to the Find My Friends and Find My iPhone apps. This way, you can see where your family is or help them locate a lost device. For those who want to keep their location private, these options can be opted-out of at any time.
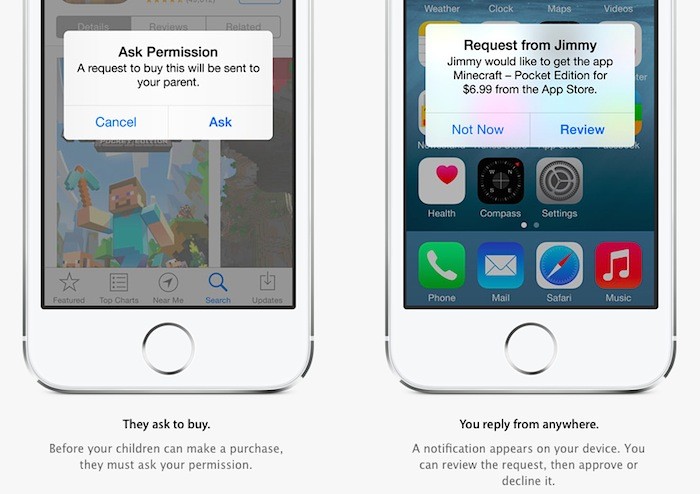
Ask To Buy
This feature is a great addition for parents. With “Ask to Buy,” when you child goes to download or purchase an app, song, movie, TV show, they must digitally ask for your permission. When they click the “Buy” or “Get” button in the App Store, a notification appears on your device, asking you to either review and approve or deny the purchase / download.
How To Set Up Family Sharing
First and foremost, everyone in the family who wants to be on Family Sharing must be on iOS 8 if they are not already. The person who sets up Family Sharing does so directly from their device and is known as the “Family Organizer.” Different permissions can be changed for individuals in the family, but the Family Organizer is the default administrator.
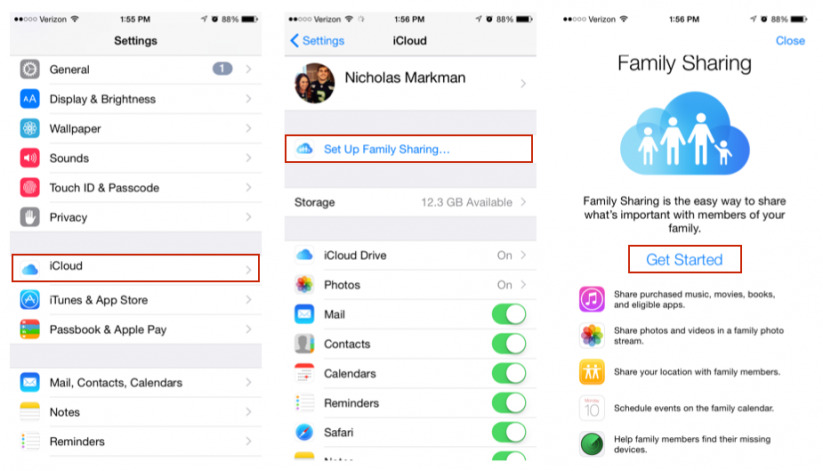
To set up Family Sharing, the Family Organizer will go into the Settings app, scroll down and select “iCloud.” Right at the top, there is a “Set Up Family Sharing…” option. Select this to initiate the setup. Select “Get Started” and then “Continue” on the page that follows. The pages that follow allows the Family Organizer to select which features of Family Sharing they want for their family.
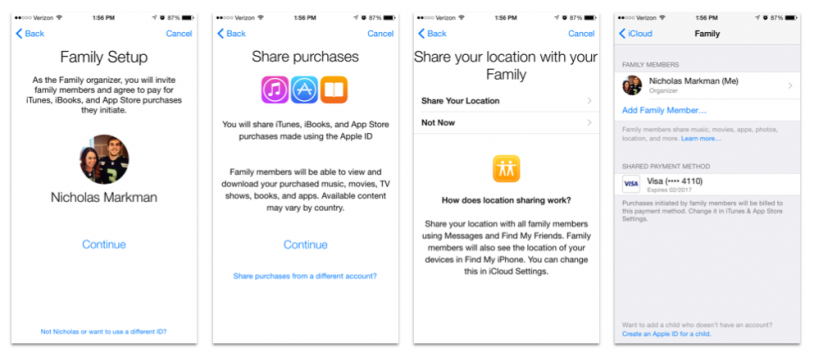
The last page of the setup is titled “Family” and is where the Organizer will invite their family members to Family Sharing by selecting “Add Family Member…” and entering each family member’s Apple ID. If anyone in the family does not have their own Apple ID, you can help them create one here. If anyone in the family is under 13, the “Create an Apple ID for a child” link at the bottom of the Family page will allow you to create a limited Apple ID for them. Once the invite has been sent, a notification will show up on each family member’s device, asking them to accept or reject the invite.
Congratulations! You and your family are now setup with Family Sharing and can enjoy the digital harmony it provides.
Managing Family Members
The last thing you might want to do after setting up Family Sharing is to manage the permissions of family members. After you add your family’s Apple ID’s and they accept the invitation, you can click on their name within the “Family” page and change their family status. For instance, multiple people can be set up as a “Parent/Guardian.” These individuals will receive notifications whenever a child tries to download an app or something in iTunes. You can also turn on and off the “Ask to Buy” feature, allowing you to control who needs permissions to download items.
